Welcome to our final day of the 10 Days of Halloween series! I'm sharing my favorite project with you today. We made this wreath in our Halloween Treat Class last month. I had a TON of retired Halloween Designer Series Papers and decided to use them in class. Each wreath was a little different and we had several color schemes going on. This is a great project to use up your retired papers. This would make a beautiful Christmas wreath, or Valentines Day wreath, or for any occasion.
This is the one I have hanging up in my house. I gave my girls the other two for their dorm rooms.
A close up of the banner. I love that retired bat punch!
Here's a selection of what some of the class attendees made.
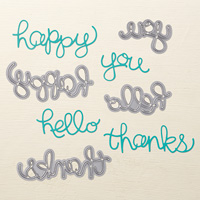
I used a selection of retired papers. The paper was cut in 12" x 1-1/2" strips and each wreath used 26-27 strips of paper. The ends were flagged and they were wrapped around a 12" chipboard wreath from Hobby Lobby. The ghosts are from the Paisley Framelits Dies and faced stamped with the Playful Pals stamp set. The "happy" is cut with the Hello You Thinlits Dies. The "HALLOWEEN" is cut with the Large Letters Framelits. I used a variety of Glimmer Paper and card stock to coordinate. LOVE IT!!!
Create die-cut letters and symbols in seconds with Framelits dies and the Big Shot. Framelits’ open design allows you to place them where you want for precise cutting. Combine die cuts to create your own messages.
* 37 dies * Largest image: 1-3/16" x 2-5/16" (3 x 5.9 cm) * Use with Big Shot
Say hello to graceful die-cut sentiments you create with Thinlits dies and the Big Shot. Thinlits Dies help you create detailed die-cuts with just a few turns of the Big Shot handle. Includes ejection holes so you can remove the paper easily.
* 4 dies * 4-1/4" x 1-1/2" (10.8 x 3.8 cm) * Includes four words: hello, happy, you, and thanks * Use with Big Shot
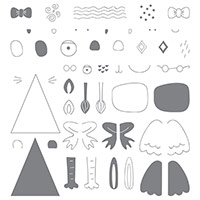
Time to play like Dr. Frankenstein and build your own creatures. But in this case, the lab is your home, the science is a stamp set, and the creatures are whimsical pets that will be adored by one and all. Combine images to make an elephant, chick, monkey, dog, frog, and pig. That's just for starters—turn your imagination loose and see what else you can make.
This is a Two-Step Stampin’ set. Combine individual stamps to build the final image you want in the colors you want.
Photopolymer stamps * Are totally transparent for perfect image placement. * Have just enough give to create a perfectly stamped image every time. * Cling like crazy to our clear blocks so you don't have to worry about slipping. * Save space—you need only one set of blocks for all your photopolymer stamps (blocks sold separately). * Come packaged in cases with images on the spine for easy storage and quick reference.
Quantity: 50 photopolymer stamps Suggested clear blocks (sold separately): a, b, c, d, g
I am really loving the new Spiral Flower Originals Dies in the Occasions Mini Catalog. Here are a couple wreaths I made last month:
This is a large wreath made on a 14" Styrofoam wreath base. It took a full pack of Real Red card stock.
I made a lot of smaller flowers to fill in the gaps after all the large roses were glued on. To make the smaller roses, I just cut the spirals in have to make 2 flowers.
TIP #1 - Wrap your wreath in the same color fabric or paper that you're using for your flowers so the wreath base doesn't show through. This was my first attempt and I didn't do that, but will from now on.
This was the second project I made with the die. I used an entire paperback book to make this 10" wreath.
It's hard to tell from the photo, but I sprayed Champagne Shimmer mist over the wreath, as well as sponged the edges of the flowers with it.
TIP #2: It's VERY helpful to have a quilling tool to roll the flowers (available at your local craft store).
Steps:
1. Purchase wreath, then wrap with either paper, ribbon or fabric in the color of the flowers.
2. Die cut flowers (you can get 6 flowers from 1 sheet of card stock or 1 flower from a paperback book page).
3. Twirl flowers tightly starting from the outside end. Fold flap for bottom and hot glue together.
4. Hot glue flowers to wreath base. I started on the inside then worked my way out.
Here's an awesome video by Stampin'Up! showing a couple more projects and the die in action. Remember - if you're going to make a lot of these, purchase a quilling tool!
Tuesday, January 22, 2013
Curled Paper Wreath tutorial for Valentines Day. I have video tutorial for you today on how to make a curled paper wreath. Here are some photos of the finished wreath. This will be my door prize for the Stamporee this Saturday.
I've used some of the new Flower Trim to accent the wreath topper.
You will have to go directly to my blog to view the video. It can't be watched on the email update.
Supplies used:
You Are Loved stamp set #123779
More Amore Specialty DSP #129309, Pool Party, Pool Party Core'dinations, Real Red & Very Vanilla card stocks
Real Red Classic Ink Pad, Vanilla 5/8" Flower Trim, Rhinestone Basic Jewels, Primrose Petals Stitched Satin Ribbon
Ovals Collection Framelits Dies and Big Shot
Extruded styrofoam wreath (10") and flat head pins
Let your favorite people know they are loved with cards made using this delightfully detailed seven-piece set. Use it to create a stack of Valentine cards, then tie a ribbon around your creations with 1-1/4" Striped Grosgrain Ribbon for a thoughtful gift.
Set Quantity: 7
Say yes to girly—it’s so you. Vintage dimensional flowers on strips of tulle. Approx. 5/8" wide. 2 yds. Vanilla.
Friday, October 19, 2012
Here is a sneak peak at the Fall Wreath Stamp Camp I'm having this Thursday. I only have one spot open, so the first one to call me will get the spot. It starts at 6:30 Thursday and the cost is $20. This is one of my favorite projects of all time. As soon as Lit'l Bita Christmas is over, I'm going to make more!!!